Xenon tutorial RSE 2017 – Table of Contents
For your information, we have GoogleAnalytics enabled for this tutorial. This is to help show our funders that the work we do is useful to others.
Getting started
On your system, start VirtualBox.
All tutorials at RSE2017 use the same virtual machine. In case you don’t have a copy of the virtual machine, you can
download it from GoogleDrive here (5.5 Gb). After the download finishes, click File in VirtualBox, then
Import appliance, then select the file you downloaded.
During the import, you’ll see an initialization wizard. Make sure that the virtual machine is configured with two CPUs.
Start the Fedora virtual machine and log in with password tutorial.
Once the system has booted, Click Activities and then start both a terminal and Firefox by clicking their respective
icons. Use Firefox to navigate to the tutorial text at http://xenonrse2017.readthedocs.io.
In the terminal, change directory to /home/tutorial/xenon and confirm that the xenon command line interface
program can be found on the system:
cd xenon
xenon --help
Interacting with filesystems
Essentially, xenon can be used to manipulate files and to interact with schedulers, where either one can be local
or remote. Let’s start simple and see if we can do something with local files. First, check its help:
xenon filesystem --help
The usage line suggests we need to pick one from {file,ftp,sftp,webdav}.
Again, choose what seems to be the simplest option (file), and again, check its help.
xenon filesystem file --help
xenon filesystem file‘s usage line seems to suggest that I need to pick one
from {copy,list,mkdir,remove,rename}. Simplest one is probably list, so:
xenon filesystem file list --help
So we need a path as final argument.
In case you hadn’t noticed the pattern, stringing together any number of xenon subcommands and appending --help
to it will get you help on the particular combination of subcommands you supplied.
The focus of this tutorial is on using Xenon’s command line interface, but be aware that other programming interfaces are available through gRPC. Where relevant, we have included equivalent code snippets, written in Java and Python, as separate tabs.
Let’s try listing the contents of /home/tutorial/xenon.
xenon filesystem file list /home/tutorial/xenon
import nl.esciencecenter.xenon.filesystems.FileSystem;
import nl.esciencecenter.xenon.filesystems.Path;
import nl.esciencecenter.xenon.filesystems.PathAttributes;

public class DirectoryListing {

    public static void main(String[] args) throws Exception {

        String adaptor = "file";
        FileSystem filesystem = FileSystem.create(adaptor);

        Path dir = new Path("/home/tutorial/xenon");
        boolean recursive = false;

        Iterable<PathAttributes> listing = filesystem.list(dir, recursive);

        for (PathAttributes elem : listing) {
            if (!elem.isHidden()) {
                System.out.println(elem.getPath());
            }
        }

    }
}
import xenon
from xenon import Path, FileSystem

xenon.init()

filesystem = FileSystem.create(adaptor='file')
path = Path("/home/tutorial/xenon")

listing = filesystem.list(path, recursive=False)

for entry in listing:
    if not entry.path.is_hidden():
        print(entry.path)

filesystem.close()
The result should be more or less the same as that of ls -1.
xenon filesystem file list has a few options that let you specify the details of the list operation, e.g.
--hidden
xenon filesystem file list --hidden /home/tutorial/xenon
import nl.esciencecenter.xenon.filesystems.FileSystem;
import nl.esciencecenter.xenon.filesystems.Path;
import nl.esciencecenter.xenon.filesystems.PathAttributes;

public class DirectoryListingShowHidden {

    public static void main(String[] args) throws Exception {

        String adaptor = "file";
        FileSystem filesystem = FileSystem.create(adaptor);

        Path dir = new Path("/home/tutorial/xenon");
        boolean recursive = false;

        Iterable<PathAttributes> listing = filesystem.list(dir, recursive);

        for (PathAttributes elem : listing) {
            System.out.println(elem.getPath());
        }
    }
}
import xenon
from xenon import Path, FileSystem

xenon.init()

filesystem = FileSystem.create(adaptor='file')
path = Path("/home/tutorial/xenon")

listing = filesystem.list(path, recursive=False)

for entry in listing:
    print(entry.path)

filesystem.close()
and --recursive
xenon filesystem file list --recursive /home/tutorial/xenon
import nl.esciencecenter.xenon.filesystems.FileSystem;
import nl.esciencecenter.xenon.filesystems.Path;
import nl.esciencecenter.xenon.filesystems.PathAttributes;

public class DirectoryListingRecursive {

    public static void main(String[] args) throws Exception {

        String adaptor = "file";
        FileSystem filesystem = FileSystem.create(adaptor);

        Path dir = new Path("/home/tutorial/xenon");
        boolean recursive = true;

        Iterable<PathAttributes> listing = filesystem.list(dir, recursive);

        for (PathAttributes elem : listing) {
            if (!elem.isHidden()) {
                System.out.println(elem.getPath());
            }
        }
    }
}
import xenon
from xenon import Path, FileSystem

xenon.init()

filesystem = FileSystem.create(adaptor='file')
path = Path("/home/tutorial/xenon")

listing = filesystem.list(path, recursive=True)

for entry in listing:
    if not entry.path.is_hidden():
        print(entry.path)

filesystem.close()
Now let’s create a file and try to use xenon to copy it:
cd /home/tutorial/xenon
echo 'some content' > thefile.txt
Check the relevant help
xenon filesystem file --help
xenon filesystem file copy --help
So, the copy subcommand takes a source path and a target path:
xenon filesystem file copy /home/tutorial/xenon/thefile.txt /home/tutorial/xenon/thefile.bak
import nl.esciencecenter.xenon.filesystems.CopyMode;
import nl.esciencecenter.xenon.filesystems.CopyStatus;
import nl.esciencecenter.xenon.filesystems.FileSystem;
import nl.esciencecenter.xenon.filesystems.Path;

public class CopyFileLocalToLocalAbsolutePaths {

    public static void main(String[] args) throws Exception {

        // use the local file system adaptor to create a file system representation
        String adaptor = "file";
        FileSystem filesystem = FileSystem.create(adaptor);

        // create Paths for the source and destination files, using absolute paths
        Path sourceFile = new Path("/home/tutorial/xenon/thefile.txt");
        Path destFile = new Path("/home/tutorial/xenon/thefile.bak");

        // create the destination file only if the destination path doesn't exist yet
        CopyMode mode = CopyMode.CREATE;
        boolean recursive = false;

        // perform the copy and wait 1000 ms for the successful or otherwise
        // completion of the operation
        String copyId = filesystem.copy(sourceFile, filesystem, destFile, mode, recursive);
        long timeoutMilliSecs = 1000;
        CopyStatus copyStatus = filesystem.waitUntilDone(copyId, timeoutMilliSecs);

        // print any exceptions
        if (copyStatus.getException() != null) {
            System.out.println(copyStatus.getException().getMessage());
        }
    }
}
import xenon
from xenon import Path, FileSystem, CopyRequest, CopyStatus

xenon.init()

filesystem = FileSystem.create(adaptor='file')
source_file = Path("/home/daisycutter/tmp/home/tutorial/xenon/thefile.txt")
dest_file = Path("/home/daisycutter/tmp/home/tutorial/xenon/thefile.bak")

# start the copy operation; no recursion, we're just copying a file
copy_id = filesystem.copy(source_file, filesystem, dest_file, mode=CopyRequest.CREATE, recursive=False)

# wait this many milliseconds for copy operations to complete
WAIT_DURATION = 1000 * 60 * 10

# wait for the copy operation to complete (successfully or otherwise)
copy_status = filesystem.wait_until_done(copy_id, WAIT_DURATION)
assert copy_status.done

# rethrow the Exception if we got one
assert copy_status.error_type == CopyStatus.NONE, copy_status.error_message

filesystem.close()
Note that the source path may be standard input, and that the target path may be standard output:
# read from stdin:
cat thefile.txt | xenon filesystem file copy - mystdin.txt

# write to stdout:
xenon filesystem file copy thefile.txt - 1> mystdout.txt
xenon filesystem file has a few more subcommands, namely mkdir, rename and remove. You can
experiment a bit more with those or move on to the next section.
Interacting with schedulers
Now let’s see if we can use schedulers, starting with SLURM. For this part, we need access to a machine that is running SLURM. To avoid problems related to network connectivity, we won’t try to connect to a physically remote SLURM machine, but instead, we’ll use a dockerized SLURM installation. This way, we can mimic whatever infrastructure we need. The setup will thus be something like this:
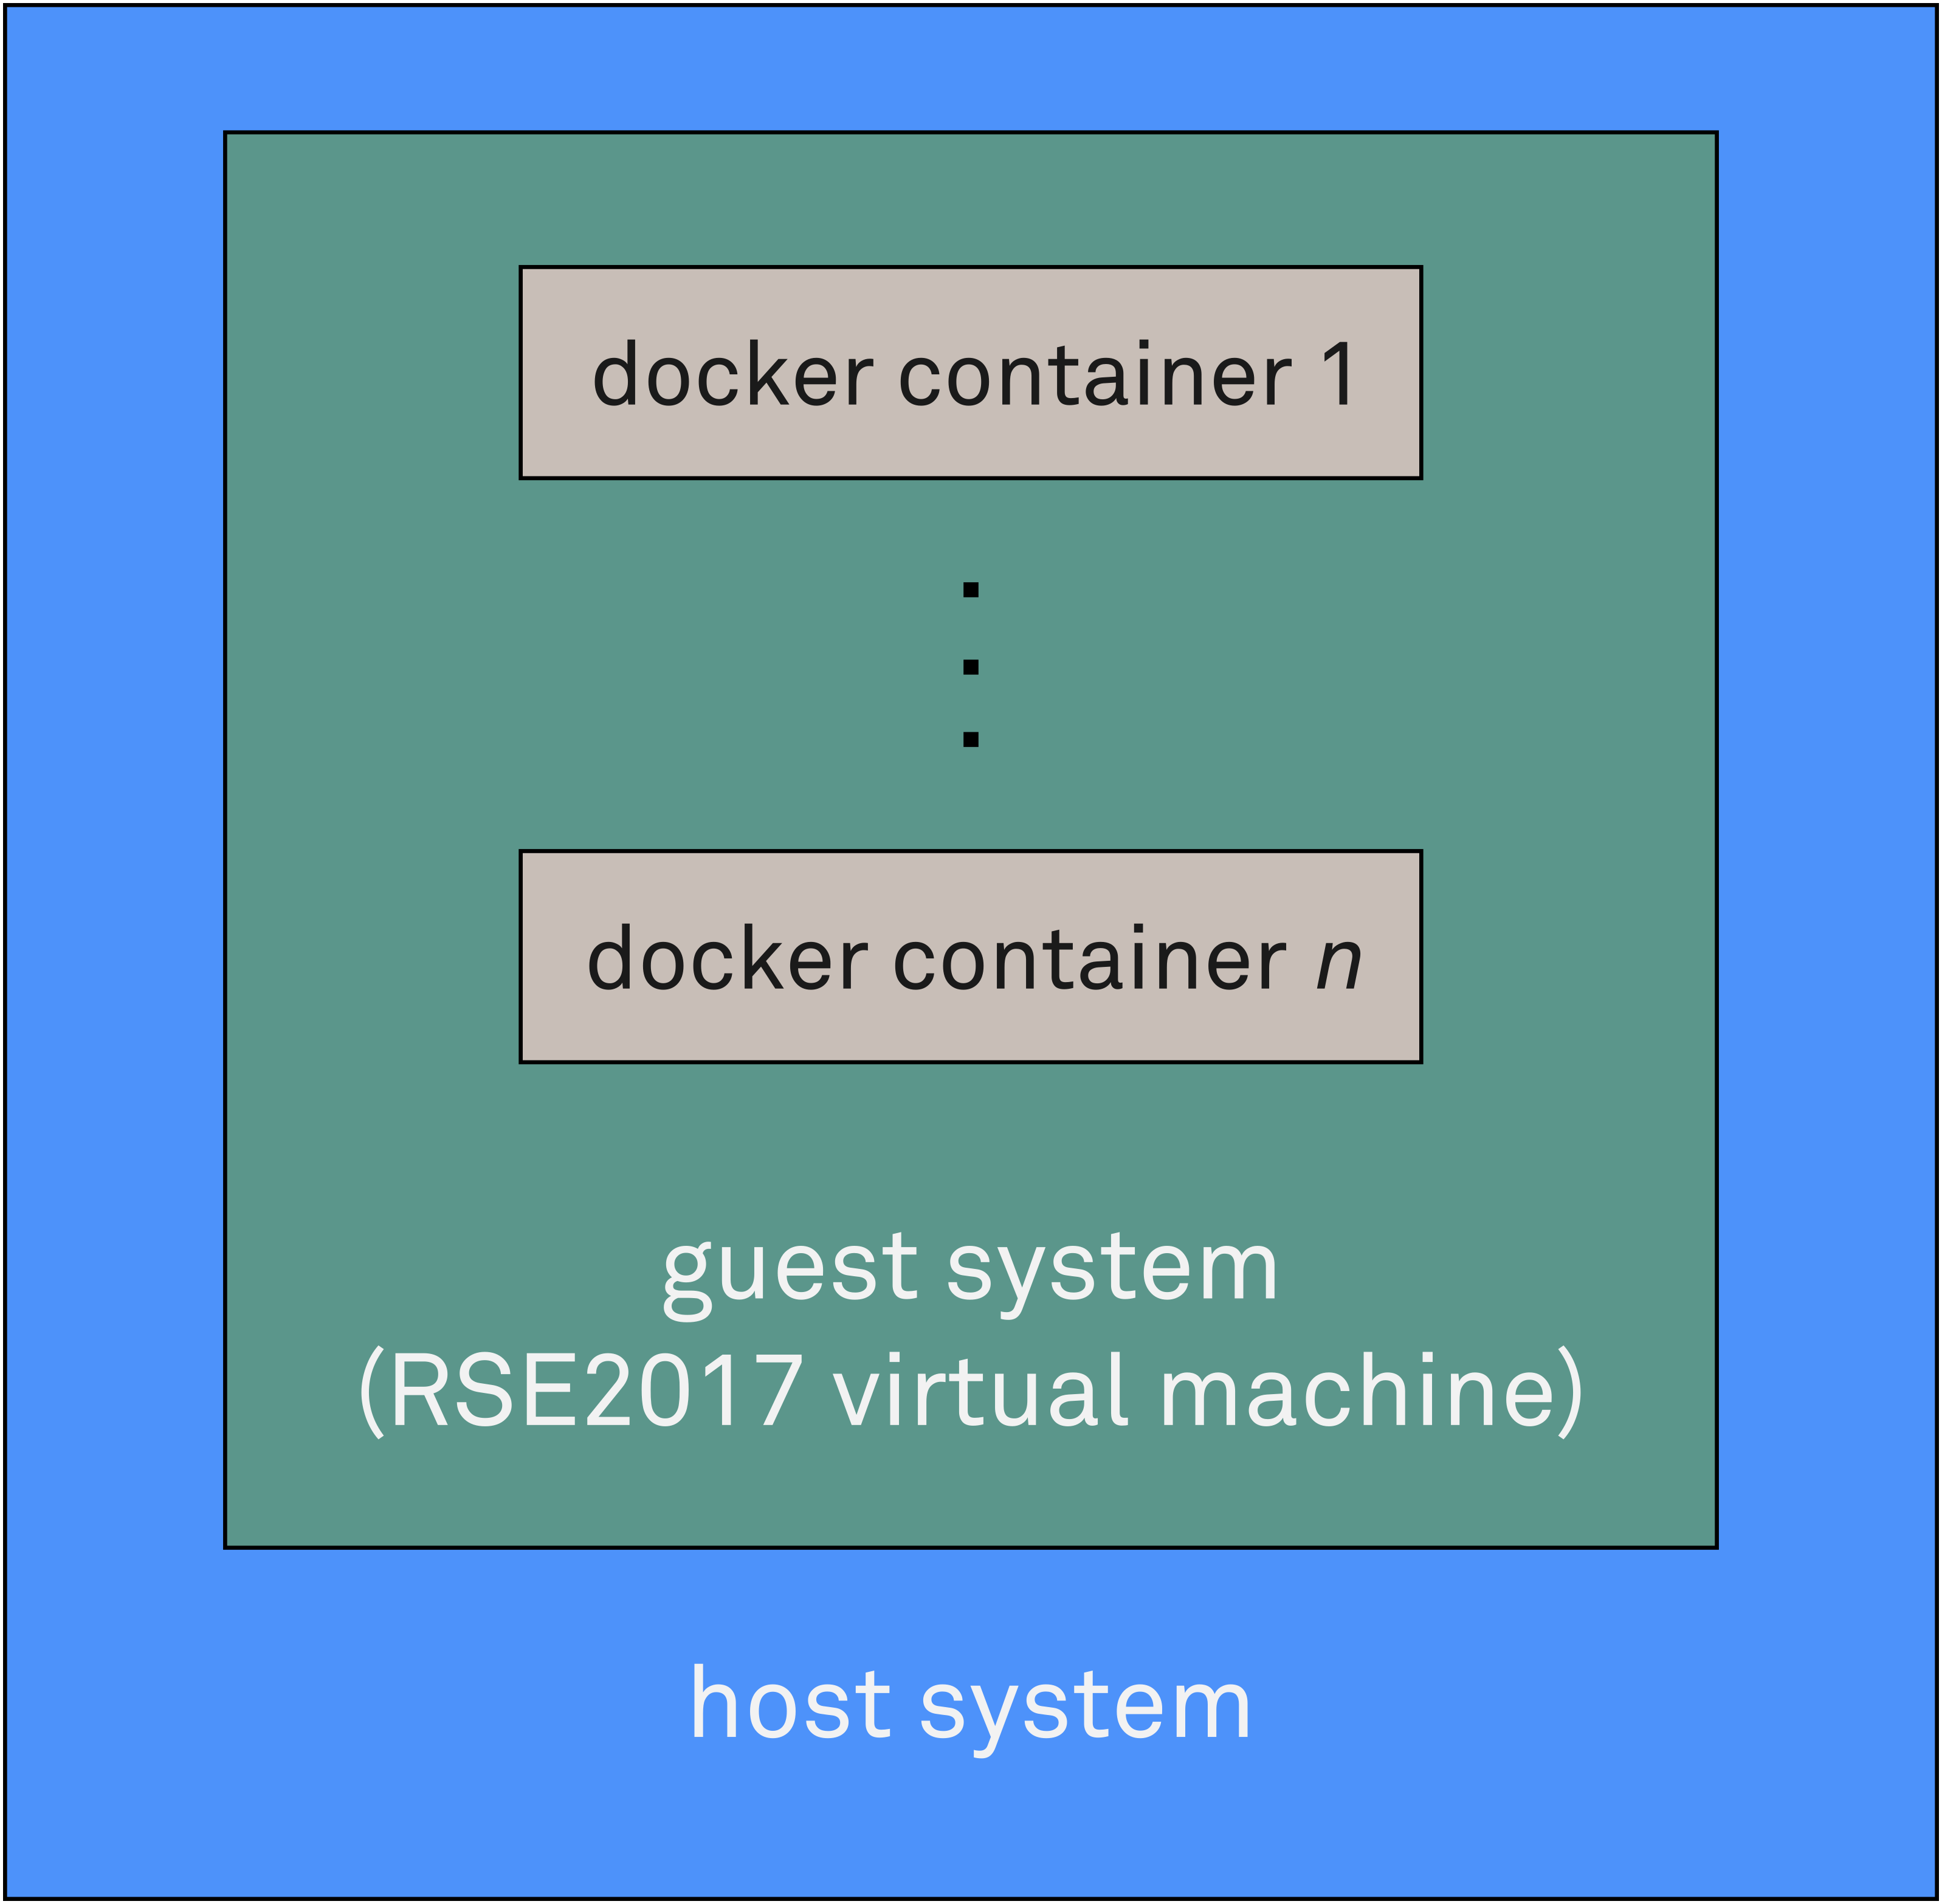
A copy of the SLURM Docker image (nlesc/xenon-slurm:17) has been included in the RSE 2017 virtual machine. Bring it up with:
docker run --detach --publish 10022:22 --hostname slurm17 nlesc/xenon-slurm:17
Use docker ps to check the state of the container
docker ps
Once the status is healthy, see if we can ssh into it on port 10022 as user xenon with password
javagat:
ssh -p 10022 xenon@localhost

# if that works, exit again
exit
Check the help to see how the slurm subcommand works:
xenon scheduler slurm --help
Let’s first ask what queues the SLURM scheduler has. For this, we need to specify
a location, otherwise xenon does not know who to ask for the list of queues. According to the help,
LOCATION is any location format supported by ssh or local scheduler.
Our dockerized SLURM machine is reachable as localhost:10022.
We’ll also need to provide a --username and --password
for that location, as follows:
xenon scheduler slurm --location localhost:10022 --username xenon --password javagat queues
# returns:
Available queues: mypartition, otherpartition
Default queue: mypartition
import nl.esciencecenter.xenon.credentials.PasswordCredential;
import nl.esciencecenter.xenon.schedulers.Scheduler;

public class SlurmQueuesGetter {

    public static void main(String[] args) throws Exception {

        String adaptor = "slurm";
        String location = "localhost:10022";

        // make the password credential for user 'xenon'
        String username = "xenon";
        char[] password = "javagat".toCharArray();
        PasswordCredential credential = new PasswordCredential(username, password);

        // create the SLURM scheduler
        Scheduler scheduler = Scheduler.create(adaptor, location, credential);

        // ask SLURM for its queues
        System.out.println("Available queues (starred queue is default):");
        for (String queueName : scheduler.getQueueNames()) {
            if (queueName == scheduler.getDefaultQueueName()) {
                System.out.println(queueName + "*");
            } else {
                System.out.println(queueName);
            }
        }
    }
}
import xenon
from xenon import Scheduler, PasswordCredential

xenon.init()

credential = PasswordCredential(username='xenon',
                                password='javagat')

scheduler = Scheduler.create(adaptor='slurm',
                             location='localhost:10022',
                             password_credential=credential)

default_queue = scheduler.get_default_queue_name()

print("Available queues (starred queue is default):")
for queue_name in scheduler.get_queue_names():
    if queue_name == default_queue:
        print("{}*".format(queue_name))
    else:
        print(queue_name)

scheduler.close()
In case you are reluctant to type plaintext passwords on the command line, for example because of logging in
~/.bash_history, know that you can supply passwords from a file, as follows:
xenon scheduler slurm --location localhost:10022 --username xenon --password @password.txt queues
in which the file password.txt should contain the password. Since everything about the user xenon is public
knowledge anyway, such security precautions are not needed for this tutorial, so we’ll just continue to use the
--password PASSWORD syntax.
Besides queues, other slurm subcommands are exec, submit, list, remove, and wait. Let’s try
to have xenon ask SLURM for its list of jobs in each queue, as follows:
xenon scheduler slurm --location localhost:10022 --username xenon --password javagat list
# should work, but we don't have any jobs yet
Now, let’s try to submit a job using slurm submit. Its usage string suggests that we need to provide (the path
of) an executable. Note that the executable should be present inside the container when SLURM starts its execution.
For the moment, we’ll use /bin/hostname as the executable. It should return the hostname slurm17 of the Docker
container, or whatever hostname you specified for it when you ran the docker run command earlier:
# check the slurm submit help for correct syntax
xenon scheduler slurm submit --help

# let xenon submit a job with /bin/hostname as executable
xenon scheduler slurm --location localhost:10022 --username xenon --password javagat \
submit /bin/hostname

# add --stdout to the submit job to capture its standard out so we know it worked:
xenon scheduler slurm --location localhost:10022 --username xenon --password javagat \
submit --stdout hostname.stdout.txt /bin/hostname

# check to see if the output was written to file /home/xenon/hostname.stdout.txt
ssh -p 10022 xenon@localhost ls -l
# see what's in it
ssh -p 10022 xenon@localhost cat hostname.stdout.txt
Below are a few more examples of slurm submit:
# executables that take options prefixed with '-' need special syntax, e.g. 'ls -la'
xenon scheduler slurm --location localhost:10022 --username xenon --password javagat \
submit --stdout /home/xenon/ls.stdout.txt ls -- -la

# check to see if the output was written to file /home/xenon/ls.stdout.txt
ssh -p 10022 xenon@localhost ls -l
# see what's in it
ssh -p 10022 xenon@localhost cat ls.stdout.txt

# submit an 'env' job with environment variable MYKEY, and capture standard out so we know it worked
xenon scheduler slurm --location localhost:10022 --username xenon --password javagat \
submit --stdout env.stdout.txt --env MYKEY=myvalue env

# check to see if the output from 'env' was written to file /home/xenon/env.stdout.txt
ssh -p 10022 xenon@localhost ls -l
# see what's in it
ssh -p 10022 xenon@localhost cat env.stdout.txt
Combining filesystems and schedulers
So far, we’ve used xenon to manipulate files on the local filesystem, and to run system executables on the remote
machine. In typical usage, however, you would use xenon to run executables or scripts of your own, which means that
we need to upload such files from the local system to the remote system.
A typical workflow may thus look like this:
- upload input file(s)
- submit job
- download generated output file(s)
Use an editor to create a file sleep.sh with the following contents (the RSE 2017 virtual machine comes with
gedit, or you can install an other editor from the repositories if you like):
#!/usr/bin/env bash
echo `date`': went to bed'
sleep $1
echo `date`': woke up'
You can test if your file is correct by:
# last argument is the sleep duration in seconds
bash sleep.sh 5
We need to upload sleep.sh to the remote machine. We can’t use xenon filesystem file like we did before,
because we’re copying between file systems, so let’s look at what other options are available:
xenon filesystem --help

# let's try sftp protocol
xenon filesystem sftp --help

# we're interested in 'upload' for now
xenon filesystem sftp upload --help
We’ll also need to tell xenon what location we want to connect to, and what credentials to use. The SLURM Docker
container we used before is accessible via SFTP using the same location, username and password as before, so let’s use
that:
# step 1: upload input file(s)
xenon filesystem sftp --location localhost:10022 --username xenon --password javagat \
upload /home/tutorial/xenon/sleep.sh /home/xenon/sleep.sh
import nl.esciencecenter.xenon.credentials.PasswordCredential;
import nl.esciencecenter.xenon.filesystems.CopyMode;
import nl.esciencecenter.xenon.filesystems.CopyStatus;
import nl.esciencecenter.xenon.filesystems.FileSystem;
import nl.esciencecenter.xenon.filesystems.Path;

public class UploadFileLocalToSftpAbsolutePaths {

    public static void main(String[] args) throws Exception {

        // use the local file system adaptor to create a file system representation
        String adaptorLocal = "file";
        FileSystem filesystemLocal = FileSystem.create(adaptorLocal);

        // define what file to upload
        Path fileLocal = new Path("/home/tutorial/xenon/sleep.sh");

        // use the sftp file system adaptor to create a file system representation; the remote
        // filesystem requires credentials to log in, so we'll have to create those too.
        String adaptorRemote = "sftp";
        String location = "localhost:10022";
        String username = "xenon";
        char[] password = "javagat".toCharArray();
        PasswordCredential credential = new PasswordCredential(username, password);
        FileSystem filesystemRemote = FileSystem.create(adaptorRemote, location, credential);

        // define which file to upload to
        Path fileRemote = new Path("/home/xenon/sleep.sh");

        // create the destination file only if the destination path doesn't exist yet
        CopyMode mode = CopyMode.CREATE;

        // no need to recurse, we're just downloading a file
        boolean recursive = false;

        // perform the copy/upload and wait 1000 ms for the successful or otherwise
        // completion of the operation
        String copyId = filesystemLocal.copy(fileLocal, filesystemRemote, fileRemote, mode, recursive);
        long timeoutMilliSecs = 1000;
        CopyStatus copyStatus = filesystemLocal.waitUntilDone(copyId, timeoutMilliSecs);

        // print any exceptions
        if (copyStatus.getException() != null) {
            System.out.println(copyStatus.getException().getMessage());
        } else {
            System.out.println("Done");
        }
    }
}
import xenon
from xenon import FileSystem, PasswordCredential, CopyRequest, Path, CopyStatus

xenon.init()

# use the local file system adaptor to create another file system representation
local_fs = FileSystem.create(adaptor='file')

# use the sftp file system adaptor to create a file system
# representation; the remote filesystem requires credentials to log in,
# so we'll have to create those too.
credential = PasswordCredential(username='xenon',
                                password='javagat')

remote_fs = FileSystem.create(adaptor='sftp',
                              location='localhost:10022',
                              password_credential=credential)

# define which file to upload
local_file = Path('/home/daisycutter/tmp/home/tutorial/xenon/sleep.sh')
remote_file = Path('/home/xenon/sleep.sh')

# create the destination file only if the destination path doesn't exist yet
mode = CopyRequest.CREATE

# no need to recurse, we're just uploading a file
recursive = False

# perform the copy/upload and wait 1000 ms for the successful or
# otherwise completion of the operation
copy_id = local_fs.copy(local_file, remote_fs, remote_file,
                        mode=mode, recursive=recursive)

copy_status = local_fs.wait_until_done(copy_id, timeout=1000)

assert copy_status.done

# rethrow the Exception if we got one
assert copy_status.error_type == CopyStatus.NONE, copy_status.error_message

# remember to close the FileSystem instances
remote_fs.close()
local_fs.close()

print('Done')
Now that the script is in place, we can submit a bash job using xenon scheduler slurm submit like before, taking
the newly uploaded sleep.sh file as input to bash, and using a sleep duration of 60 seconds:
# step 2: submit job
xenon scheduler slurm --location localhost:10022 --username xenon --password javagat \
submit --stdout sleep.stdout.txt bash sleep.sh 60

# (should return an identifier for the job)
With the job running, let’s see if it shows up in any of the SLURM queues:
xenon scheduler slurm --location localhost:10022 --username xenon --password javagat list
# should have the job identifier in it that was printed on the command line
import nl.esciencecenter.xenon.credentials.PasswordCredential;
import nl.esciencecenter.xenon.schedulers.Scheduler;

public class SlurmJobListGetter {

    public static void main(String[] args) throws Exception {

        String adaptor = "slurm";
        String location = "localhost:10022";

        // make the password credential for user 'xenon'
        String username = "xenon";
        char[] password = "javagat".toCharArray();
        PasswordCredential credential = new PasswordCredential(username, password);

        // create the SLURM scheduler
        Scheduler scheduler = Scheduler.create(adaptor, location, credential);

        // ask SLURM for its queues and list the jobs in each
        for (String queueName : scheduler.getQueueNames()) {
            System.out.println("List of jobs in queue '" + queueName + "' for SLURM at " + location + "");
            String[] jobs = scheduler.getJobs(queueName);
            if (jobs.length == 0) {
                System.out.println("(No jobs)");
            } else {
                for (String job : jobs) {
                    System.out.println(job);
                }
            }
        }
    }
}
import xenon
from xenon import PasswordCredential, Scheduler

xenon.init()

credential = PasswordCredential(username='xenon',
                                password='javagat')

location = 'localhost:10022'

scheduler = Scheduler.create(adaptor='slurm',
                             location=location,
                             password_credential=credential)

for queue_name in scheduler.get_queue_names():
    print("List of jobs in queue {queue_name} for SLURM at {location}"
          .format(queue_name=queue_name, location=location))
    jobs = scheduler.get_jobs([queue_name])
    if not jobs:
        print("(No jobs)")
    else:
        for job in jobs:
            print("    {}".format(job))

scheduler.close()
When we submitted, we did not specify any queues, so the default queue mypartition was used:
xenon scheduler slurm --location localhost:10022 --username xenon --password javagat list --queue mypartition
# should have the job identifier in it that was printed on the command line

xenon scheduler slurm --location localhost:10022 --username xenon --password javagat list --queue otherpartition
# this queue is empty
With step 1 (upload) and step 2 (submit) covered, step 3 (download) remains:
# step 3: download generated output file(s)
xenon filesystem sftp --location localhost:10022 --username xenon --password javagat \
download /home/xenon/sleep.stdout.txt /home/tutorial/xenon/sleep.stdout.txt
import nl.esciencecenter.xenon.credentials.PasswordCredential;
import nl.esciencecenter.xenon.filesystems.CopyMode;
import nl.esciencecenter.xenon.filesystems.CopyStatus;
import nl.esciencecenter.xenon.filesystems.FileSystem;
import nl.esciencecenter.xenon.filesystems.Path;

public class DownloadFileSftpToLocalAbsolutePaths {

    public static void main(String[] args) throws Exception {

        // use the sftp file system adaptor to create a file system representation; the remote
        // filesystem requires credentials to log in, so we'll have to create those too.
        String adaptorRemote = "sftp";
        String location = "localhost:10022";
        String username = "xenon";
        char[] password = "javagat".toCharArray();
        PasswordCredential credential = new PasswordCredential(username, password);
        FileSystem filesystemRemote = FileSystem.create(adaptorRemote, location, credential);

        // define which file to download
        Path fileRemote = new Path("/home/xenon/sleep.stdout.txt");

        // use the local file system adaptor to create a file system representation
        String adaptorLocal = "file";
        FileSystem filesystemLocal = FileSystem.create(adaptorLocal);

        // define what file to download to
        Path fileLocal = new Path("/home/tutorial/xenon/sleep.stdout.txt");

        // create the destination file only if the destination path doesn't exist yet
        CopyMode mode = CopyMode.CREATE;

        // no need to recurse, we're just downloading a file
        boolean recursive = false;

        // perform the copy/download and wait 1000 ms for the successful or otherwise
        // completion of the operation
        String copyId = filesystemRemote.copy(fileRemote, filesystemLocal, fileLocal, mode, recursive);
        long timeoutMilliSecs = 1000;
        CopyStatus copyStatus = filesystemRemote.waitUntilDone(copyId, timeoutMilliSecs);

        // print any exceptions
        if (copyStatus.getException() != null) {
            System.out.println(copyStatus.getException().getMessage());
        } else {
            System.out.println("Done");
        }
    }
}
import xenon
from xenon import FileSystem, PasswordCredential, CopyRequest, Path, CopyStatus

xenon.init()

# use the sftp file system adaptor to create a file system
# representation; the remote filesystem requires credentials to log in,
# so we'll have to create those too.
credential = PasswordCredential(username='xenon',
                                password='javagat')

remote_fs = FileSystem.create(adaptor='sftp',
                              location='localhost:10022',
                              password_credential=credential)

# use the local file system adaptor to create another file system representation
local_fs = FileSystem.create(adaptor='file')

# define which file to download
remote_file = Path('/home/xenon/sleep.stdout.txt')
local_file = Path('/home/daisycutter/tmp/home/tutorial/xenon/sleep.stdout.txt')

# create the destination file only if the destination path doesn't exist yet
mode = CopyRequest.CREATE

# no need to recurse, we're just uploading a file
recursive = False

# perform the copy/download and wait 1000 ms for the successful or
# otherwise completion of the operation
copy_id = remote_fs.copy(remote_file, local_fs, local_file,
                        mode=mode, recursive=recursive)

copy_status = remote_fs.wait_until_done(copy_id, timeout=1000)

assert copy_status.done

# rethrow the Exception if we got one
assert copy_status.error_type == CopyStatus.NONE, copy_status.error_message

# remember to close the FileSystem instances
remote_fs.close()
local_fs.close()

print('Done')
By this time you may start to consider putting those 3 commands in a script, as follows:
#!/usr/bin/env bash

# step 1: upload input file(s)
xenon filesystem sftp --location localhost:10022 --username xenon --password javagat \
upload /home/tutorial/xenon/sleep.sh /home/xenon/sleep.sh

# step 2: submit job
xenon scheduler slurm --location localhost:10022 --username xenon --password javagat \
submit --stdout sleep.stdout.txt bash sleep.sh 60

# step 3: download generated output file(s)
xenon filesystem sftp --location localhost:10022 --username xenon --password javagat \
download /home/xenon/sleep.stdout.txt /home/tutorial/xenon/sleep.stdout.txt
import nl.esciencecenter.xenon.credentials.PasswordCredential;
import nl.esciencecenter.xenon.filesystems.CopyMode;
import nl.esciencecenter.xenon.filesystems.FileSystem;
import nl.esciencecenter.xenon.filesystems.Path;
import nl.esciencecenter.xenon.schedulers.JobDescription;
import nl.esciencecenter.xenon.schedulers.Scheduler;

public class AllTogetherNowWrong {

    public static void main(String[] args) throws Exception {

        /*
         * step 1: upload input file(s)
         */

        // create the local filesystem representation
        String fileAdaptorLocal = "file";
        FileSystem filesystemLocal = FileSystem.create(fileAdaptorLocal);

        // the remote system requires credentials, create them here:
        String username = "xenon";
        char[] password = "javagat".toCharArray();
        PasswordCredential credential = new PasswordCredential(username, password);

        // create the remote filesystem representation and specify the executable's path
        String fileAdaptorRemote = "sftp";
        String filesystemRemoteLocation = "localhost:10022";
        FileSystem filesystemRemote = FileSystem.create(fileAdaptorRemote,
                filesystemRemoteLocation, credential);

        {
            // specify the behavior in case the target path exists already
            CopyMode copyMode = CopyMode.CREATE;

            // no recursion, we're just copying a file
            boolean recursive = false;

            // specify the path of the script file on the local and on the remote
            Path fileLocal = new Path("/home/tutorial/xenon/sleep.sh");
            Path fileRemote = new Path("/home/xenon/sleep.sh");

            // start the copy operation
            filesystemLocal.copy(fileLocal, filesystemRemote, fileRemote, copyMode, recursive);

        }


        /*
         * step 2: submit job and capture its job identifier
         */

        // create the SLURM scheduler representation
        String schedulerAdaptor = "slurm";
        String schedulerLocation = "localhost:10022";
        Scheduler scheduler = Scheduler.create(schedulerAdaptor, schedulerLocation, credential);

        // compose the job description:
        JobDescription jobDescription = new JobDescription();
        jobDescription.setExecutable("bash");
        jobDescription.setArguments("sleep.sh", "60");
        jobDescription.setStdout("sleep.stdout.txt");

        scheduler.submitBatchJob(jobDescription);


        /*
         *  step 3: download generated output file(s)
         */

        {
            // specify the behavior in case the target path exists already
            CopyMode copyMode = CopyMode.CREATE;

            // no recursion, we're just copying a file
            boolean recursive = false;

            // specify the path of the stdout file on the remote and on the local machine
            Path fileRemote = new Path("/home/xenon/sleep.stdout.txt");
            Path fileLocal = new Path("/home/tutorial/xenon/sleep.stdout.txt");

            // start the copy operation
            filesystemRemote.copy(fileRemote, filesystemLocal, fileLocal, copyMode, recursive);

        }

        System.out.println("Done.");

    }
}
However, if you create the script above and run it, you’ll find that:
- Xenon complains about some destination paths already existing.
- The script finishes suspiciously quickly;
The first error is easily avoided by adding a --replace optional argument after upload and download, but
that does not address the real issue: that of Xenon not waiting for the completion of our sleep job.
Not to worry though, we can use xenon scheduler slurm wait to wait for jobs to finish. In order to make this work,
we do need to capture the identifier for a specific job, otherwise we don’t know what to wait for.
Adapt the script as follows and run it:
#!/usr/bin/env bash

# step 1: upload input file(s)
xenon filesystem sftp --location localhost:10022 --username xenon --password javagat \
upload --replace /home/tutorial/xenon/sleep.sh /home/xenon/sleep.sh

# step 2: submit job and capture its job identifier
JOBID=$(xenon scheduler slurm --location localhost:10022 --username xenon --password javagat \
submit --stdout sleep.stdout.txt bash sleep.sh 60)

# add blocking wait
xenon scheduler slurm --location localhost:10022 --username xenon --password javagat \
wait $JOBID

# step 3: download generated output file(s)
xenon filesystem sftp --location localhost:10022 --username xenon --password javagat \
download --replace /home/xenon/sleep.stdout.txt /home/tutorial/xenon/sleep.stdout.txt
import nl.esciencecenter.xenon.credentials.PasswordCredential;
import nl.esciencecenter.xenon.filesystems.CopyMode;
import nl.esciencecenter.xenon.filesystems.CopyStatus;
import nl.esciencecenter.xenon.filesystems.FileSystem;
import nl.esciencecenter.xenon.filesystems.Path;
import nl.esciencecenter.xenon.schedulers.JobDescription;
import nl.esciencecenter.xenon.schedulers.JobStatus;
import nl.esciencecenter.xenon.schedulers.Scheduler;

public class AllTogetherNow {

    public static void main(String[] args) throws Exception {

        /*
         * step 1: upload input file(s)
         */

        // create the local filesystem representation
        String fileAdaptorLocal = "file";
        FileSystem filesystemLocal = FileSystem.create(fileAdaptorLocal);

        // the remote system requires credentials, create them here:
        String username = "xenon";
        char[] password = "javagat".toCharArray();
        PasswordCredential credential = new PasswordCredential(username, password);

        // create the remote filesystem representation and specify the executable's path
        String fileAdaptorRemote = "sftp";
        String filesystemRemoteLocation = "localhost:10022";
        FileSystem filesystemRemote = FileSystem.create(fileAdaptorRemote,
                filesystemRemoteLocation, credential);

        // when waiting for jobs or copy operations to complete, wait indefinitely
        final long WAIT_INDEFINITELY = 0;

        {
            // specify the behavior in case the target path exists already
            CopyMode copyMode = CopyMode.REPLACE;

            // no recursion, we're just copying a file
            boolean recursive = false;

            // specify the path of the script file on the local and on the remote
            Path fileLocal = new Path("/home/tutorial/xenon/sleep.sh");
            Path fileRemote = new Path("/home/xenon/sleep.sh");

            // start the copy operation
            String copyId = filesystemLocal.copy(fileLocal, filesystemRemote, fileRemote, copyMode, recursive);

            // wait for the copy operation to complete (successfully or otherwise)
            CopyStatus status = filesystemLocal.waitUntilDone(copyId, WAIT_INDEFINITELY);

            // rethrow the Exception if we got one
            if (status.hasException()) {
                throw status.getException();
            }

        }


        /*
         * step 2: submit job and capture its job identifier
         */

        // create the SLURM scheduler representation
        String schedulerAdaptor = "slurm";
        String schedulerLocation = "localhost:10022";
        Scheduler scheduler = Scheduler.create(schedulerAdaptor, schedulerLocation, credential);

        // compose the job description:
        JobDescription jobDescription = new JobDescription();
        jobDescription.setExecutable("bash");
        jobDescription.setArguments("sleep.sh", "60");
        jobDescription.setStdout("sleep.stdout.txt");

        String jobId = scheduler.submitBatchJob(jobDescription);

        // wait for the job to finish before attempting to copy its output file(s)
        JobStatus jobStatus = scheduler.waitUntilDone(jobId, WAIT_INDEFINITELY);

        // rethrow the Exception if we got one
        if (jobStatus.hasException()) {
            throw jobStatus.getException();
        }


        /*
         *  step 3: download generated output file(s)
         */

        {
            // specify the behavior in case the target path exists already
            CopyMode copyMode = CopyMode.REPLACE;

            // no recursion, we're just copying a file
            boolean recursive = false;

            // specify the path of the stdout file on the remote and on the local machine
            Path fileRemote = new Path("/home/xenon/sleep.stdout.txt");
            Path fileLocal = new Path("/home/tutorial/xenon/sleep.stdout.txt");

            // start the copy operation
            String copyId = filesystemRemote.copy(fileRemote, filesystemLocal, fileLocal, copyMode, recursive);

            // wait for the copy operation to complete (successfully or otherwise)
            CopyStatus status = filesystemRemote.waitUntilDone(copyId, WAIT_INDEFINITELY);

            // rethrow the Exception if we got one
            if (status.hasException()) {
                throw status.getException();
            }

        }

        System.out.println("Done.");

    }
}
import xenon
from xenon import FileSystem, PasswordCredential, CopyRequest, Path, CopyStatus, Scheduler, JobDescription, JobStatus


def upload():

    # define which file to upload
    local_file = Path('/home/daisycutter/tmp/home/tutorial/xenon/sleep.sh')
    remote_file = Path('/home/xenon/sleep.sh')

    # create the destination file only if the destination path doesn't exist yet
    mode = CopyRequest.CREATE

    # no need to recurse, we're just uploading a file
    recursive = False

    # perform the copy/upload and wait 1000 ms for the successful or
    # otherwise completion of the operation
    copy_id = local_fs.copy(local_file, remote_fs, remote_file,
                            mode=mode, recursive=recursive)

    copy_status = local_fs.wait_until_done(copy_id, timeout=5000)

    assert copy_status.done

    # rethrow the Exception if we got one
    assert copy_status.error_type == CopyStatus.NONE, copy_status.error_message

    print('Done uploading.')


def submit():

    description = JobDescription(executable='bash',
                                 arguments=['sleep.sh', '60'],
                                 stdout='sleep.stdout.txt')

    scheduler = Scheduler.create(adaptor='slurm',
                                 location='localhost:10022',
                                 password_credential=credential)

    job_id = scheduler.submit_batch_job(description)

    print('Done submitting.')

    # wait for the job to finish before attempting to copy its output file(s)
    job_status = scheduler.wait_until_done(job_id, 10*60*1000)

    assert job_status.done

    # rethrow the Exception if we got one
    assert job_status.error_type == JobStatus.NONE, job_status.error_message

    print('Done executing on the remote.')

    # make sure to synchronize the remote filesystem
    job_id = scheduler.submit_batch_job(JobDescription(executable='sync'))
    scheduler.wait_until_done(job_id)

    scheduler.close()


def download():

    # define which file to download
    remote_file = Path('/home/xenon/sleep.stdout.txt')
    local_file = Path('/home/daisycutter/tmp/home/tutorial/xenon/sleep.stdout.txt')

    # create the destination file only if the destination path doesn't exist yet
    mode = CopyRequest.CREATE

    # no need to recurse, we're just uploading a file
    recursive = False

    # perform the copy/download and wait 1000 ms for the successful or
    # otherwise completion of the operation
    copy_id = remote_fs.copy(remote_file, local_fs, local_file,
                             mode=mode, recursive=recursive)

    copy_status = remote_fs.wait_until_done(copy_id, timeout=5000)

    assert copy_status.done

    # rethrow the Exception if we got one
    assert copy_status.error_type == CopyStatus.NONE, copy_status.error_message

    print('Done downloading.')


xenon.init()

# use the local file system adaptor to create a file system representation
local_fs = FileSystem.create(adaptor='file')

# use the sftp file system adaptor to create another file system representation;
# the remote filesystem requires credentials to log in, so we'll have to
# create those too.
credential = PasswordCredential(username='xenon',
                                password='javagat')

remote_fs = FileSystem.create(adaptor='sftp',
                              location='localhost:10022',
                              password_credential=credential)

upload()
submit()
download()

# remember to close the FileSystem instances
remote_fs.close()
local_fs.close()

print('Done')
After about 60 seconds, you should have a local copy of sleep.stdout.txt, with the correct contents this time.
Congratulations – you have successfully completed the tutorial!
What’s next?
If you want, you can continue reading about relevant subjects, or try some of the suggested exercises.
Further reading
- Xenon’s JavaDoc on jitpack.io
- PyXenon: The Python interface to Xenon (github.com, readthedocs.io)
Suggested exercises
- Repeat selected exercises, but test against a physically remote system instead of a Docker container. Requires credentials for the remote system.
- Repeat selected exercises using WebDAV instead of SFTP. We included the Docker container nlesc/xenon-webdav as part of the virtual machine for testing.
- Update
xenon-clito the latest version, so you can use thes3file adaptor to connect to Amazon’s Simple Storage Service. Requires downloading of the Docker container nlesc/xenon-s3 (300MB) from DockerHub for testing on your own machine, or an Amazon Web Services account for testing against a physically remote system.